

IP Cameras:
IP cameras are sophisticated pieces of technology that have many features that other security cameras do not have. IP cameras at this point have the capability to surpass modern HD cameras in visual resolution and clarity once you start getting into the higher end models. There are many reasons to choose to go IP, but the improved visual capabilities are one of the most substantial qualities setting IP cameras above the rest.
Each IP camera will have it’s own IP address, making it accessible from outside your network. You can also connect directly to the IP address of the camera in your web browser and view its live feed, or connect to it from SmartPSS software and view its live feed. Certain IP cameras can also be wireless depending on the model. The cost per camera is much higher with IP cameras however, and this is another quality setting them apart from other HD and Analog cameras. Especially when you need extra features like good quality, long distance night-vision, or multifocal lenses, your cost per camera can grow exponentially.
To add a IP camera to your NVR, first make sure you have the capability with your DVR/NVR recording unit. Depending on the model, if it is a hybrid or tribrid it could support 1-2 or 16 or more IP cameras. This all depends on the actual unit and it is important to check with the manufacturer to see what your unit can support. Actually adding the camera to your system is very simple and easy. It is also important to check the resolution of the camera and compare with what your NVR can support, as not all NVRs can support 2-3 megapixel cameras. You can go back and turn down the resolution but this will affect the visual clarity to a degree. All important details to keep in mind before connecting your IP cameras to your system.
Adding IP cameras to your NVR:
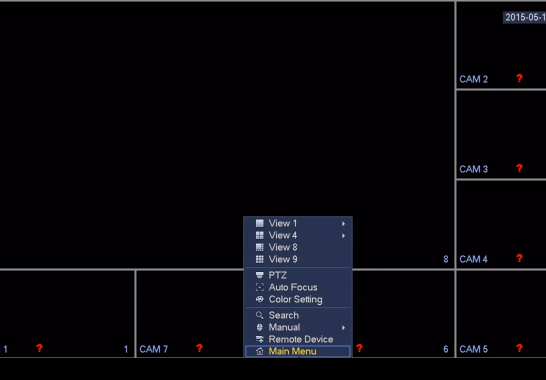
First, go to the main screen of your NVR showing live feeds when you power it on. Right click anywhere on the screen and go to the bottom of the list and select “main menu” to bring up the main menu options.
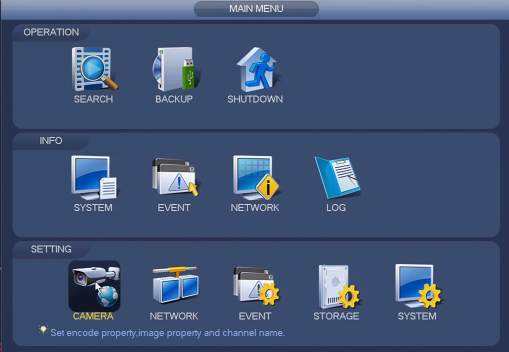
From there, towards the bottom there will be an option for “Camera”. Choose this to bring up the next menu.
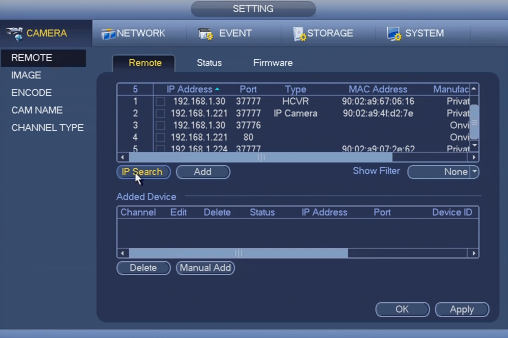
Make sure the “encode” tab to the left is selected to bring up the menu we need.
Click on the option “IP Search” to see all available IP addresses on the network. This will show you the cameras that are on the network.
Find the IP address for the camera you wish to use and select it by clicking on the box next to its information.
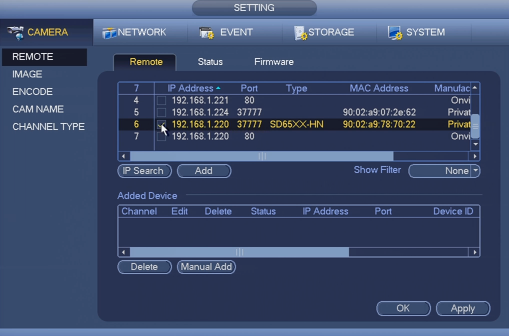
Click “Add” to make sure it is added to your NVR.
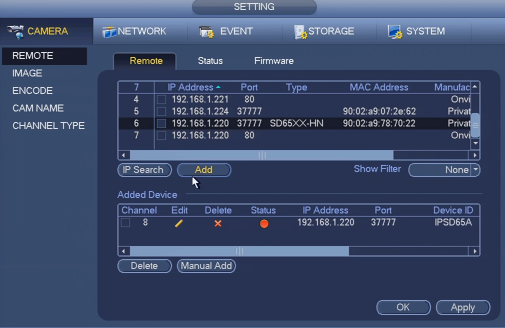
Once added you should see it in the section labeled “Added Devices.” Make sure the status light next to the device is green showing it is functional.
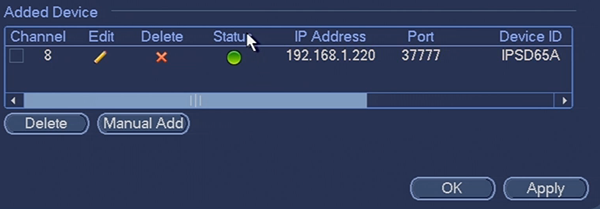
Click “apply” and “ok” to save all settings, from there you should be seeing live feed for the
IP camera once the proper channel is selected.
If the live stream cuts out or does not configure on the system correctly, this is an indication that you might be using a IP cam with higher resolution than can be supported on your NVR. Refer to the manufacturer information for both the NVR and IP cameras to see where the problem lies and again, you can turn down the picture quality on the camera settings to enable it to be used on your NVR, at the expense of some resolution and clarity.
Anthony Berlin
Latest posts by Anthony Berlin (see all)
- Dummies Guide To Remote Viewing Security Cameras - November 5, 2018
- How to add IP cameras and HD Cameras to your Hybrid DVR - May 17, 2016
- How to change the order of IP cameras connected to your PoE NVR - February 29, 2016