

Taking a Snapshot is a feature that comes standard with our IP security cameras and allows you to save images at specified time intervals for playback image by image as opposed to standard video recording. This automatic photo capture can be used for many different purposes, such as taking photos for cataloging progress at a construction site over a large time span. You can even set the camera to record normal video, and have the snapshot feature take snapshots at fixed time intervals or only when motion is detected. You can save the images to an on-board micro SD card on select models, or upload images to a FTP server. This is perfect for use in time lapse photography employed in different scenarios.
Setting the IP camera snapshot schedule

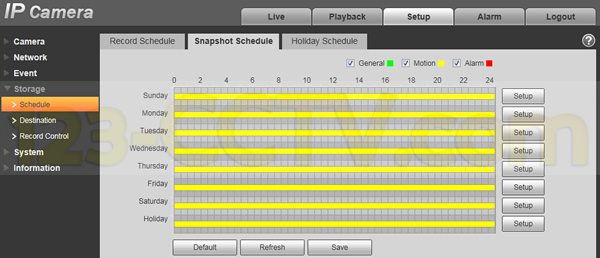
When accessing the IP camera online through its IP address there is the ability to take a single snapshot as well as triple snapshot, much like you would do with a webcam. The icons for these options are located under the tabs for live, setup and such on the main screen. To make a schedule to take snapshots at certain time intervals you would schedule this much like you would on a Security DVR. By clicking on SETUP / STORAGE / SCHEDULE you will open up the schedules for video recording and snapshot. From there you can set up your schedule to take snapshots at certain times.
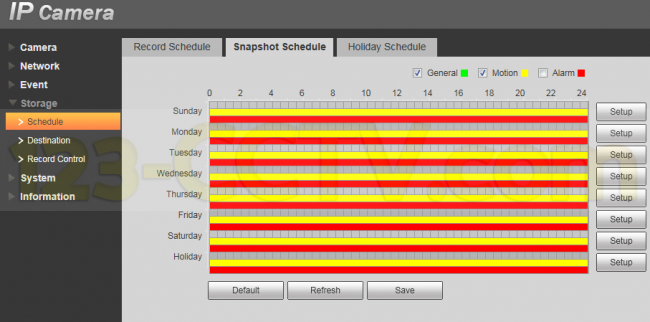
There are three tabs from there to access. Recording Schedule for normal recording schedules, Snapshot Schedule, and Holiday Schedule. For our purposes the Snapshot Schedule tab is what we are concerned with. Accessing this menu you have the ability to set your IP camera to take snapshots on certain days, all days of the week and between certain time intervals. Let’s say you don’t want to record video during weekdays, and only want snapshots taken at fixed time intervals. You can set Monday thru Friday between 0 and 24 hours to General. Or if you want snapshots only on motion, simply select Motion from the check box above.

If you set Motion above, be sure to also enable motion detection in the Event settings on the camera. This is crucial, otherwise you will not be able to record motion capture snapshots. To enable this, access Event / Video Detect / Motion Detect, to bring up the motion detect window. From here you must make sure the Enable box is checked. Here you will also see some other options like record delay, and anti dither, but the enable box is the only requirement to make sure it is motion detection ready.
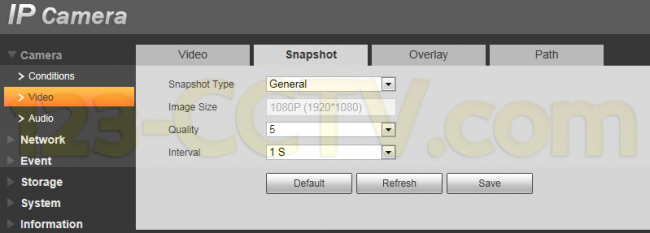
There is also a separate menu for some of the picture quality related options of the snapshot feature. By clicking and navigating to SETUP / Camera / Video and selecting the Snapshot tab, you will see several options for different attributes of still picture capture on the camera.
There is a Snapshot Type selection with either General or Event options. This is for choosing whether the snapshot will be for scheduling (general) purposes, or only in the event motion is detected.
The Image Size settings allow you to set how detailed the actual snapshot picture will be. Depending on the resolution of the IP camera you purchase, you can capture still shots up to 3 megapixels (2048 x 1536 pixels).
The Quality setting ranges from 1-6, with 6 being the best. This determines the amount of compression applied to the image, hence the quality of the image itself.
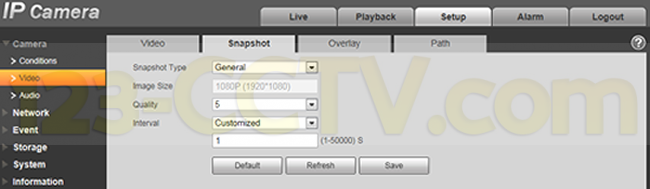
Most importantly, the last setting is the selection for the time Interval between snapshots when you are taking a constant stream of photos. Listed by default is the option between a 1 and 7 second wait between images, and a customized option. The Customized Option allows you to set the interval between photo capture to be anywhere from 1 to 50,000 seconds which is equivalent to almost 14 hours.
Make sure to save your settings and you’re done.
Configuring snapshots to save to local SD card
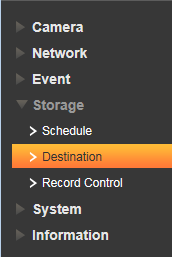
To save the snapshots you take to a local SD card within the camera itself, there is a few more steps to take to make sure this is set up. First with the the Setup tab at the top selected, you must then go to the side bar and select the Storage drop down menu. Then choose the option Destination.
This brings up the menu for destination. The first menu tab that is selected is Path. This determines where the snapshots will go. There is three types of snapshots it will show options for, General, Motion, and Alarm. Make sure that for all three of these that the box underneath for Local is selected. This tells the camera that you want to save the snapshots to a local device and not use File Transfer Protocol or any other methods.
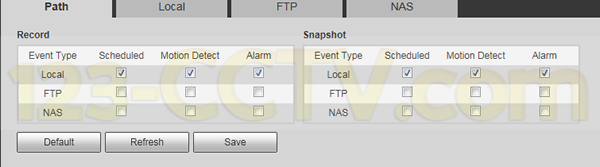
The last step is to then access the tab that says Local next to the tab that says Path. Here you will select the option that you want to save to locally. If you do not see the SD card as an option, hit refresh. If it does not allow to select the SD card, you will have to format it by selecting the SD card and hitting the format option. Make sure you select the SD card to save as always save your settings.

After this final step, you should be ready to start taking snapshots with your IP camera.
Anthony Berlin
Latest posts by Anthony Berlin (see all)
- Dummies Guide To Remote Viewing Security Cameras - November 5, 2018
- How to add IP cameras and HD Cameras to your Hybrid DVR - May 17, 2016
- How to change the order of IP cameras connected to your PoE NVR - February 29, 2016