

Cloud storage has become increasing popular the last few years for storage solution needs that arise in companies. It has also become very popular as a solution for IP based security camera systems that need more space for storage, as video recording is very memory intensive. HD video uploads require a high bandwidth and immense amounts of hard drive space. As video quality keeps getting better with more resolution, this only adds to the need for more memory.
Cloud storage provides an extra level of security by allowing off-site backup of your data. In the event of catastrophe like fires or theft, your data will still be accessible from anywhere with cloud storage. This is one of the best ways of backing up your sensitive and important data as the storage is offsite, supported by companies with a lot of resources and is accessible wherever you need it.
Using quality equipment:
As always, proper equipment is key to providing a professional service or running a business properly, in all walks of life. This is relevant to your memory storage solutions for many reasons. Using good quality IP cameras will enable your recordings and data transfers to be as efficient and secure as possible. When your security and well being are what’s at risk, using professional grade equipment will make the difference when it matters. This is not just for visual quality either, there is more to it than that.
Cheaper equipment lacks in several key features that are necessary to enable cloud storage and networking options in general. You want quality cameras and DVRs/NVRs that enable you to configure them with online services and storage options. Cheaper cameras do not come standard with many of the principle networking requirements that are essential in enabling your IP cameras to work with any service even outside the realm of cloud storage.
When using paid services for your cloud storage needs, you are typically buying cheaper equipment up front, and then paying exorbitant monthly fees for the storage. This is normally a small amount of storage space and when you add more cameras on to the system, the charges add up fast.
Options for cloud storage:
If you decide cloud storage is something you want to integrate into your security camera system, there are several different options to consider. This article will go over three cost effective methods, two of which do not entail any monthly fee.
• Personal FTP Computer: Using free software like FileZilla you can transform your PC or Mac into a FTP server that your IP cameras can upload video and/or snapshots to when activated by motion.
• Offsite NVR: You can stream video directly from your cameras over the internet to a NVR located off-site for video storage. The NVR acts as the server in a cloud (offsite). Alternatively it is possible to have 2 NVRs where the primary NVR is on the same site as the cameras. The secondary NVR taps in to video streams from the primary NVR for backup of video in real time.
• Paid Cloud Storage: Using a paid service to host your cloud storage. Costly monthly/yearly charges apply to this option.
Requirements to keep in mind when using cloud storage:
There are several details to keep in mind when configuring cloud storage with your cameras. First and perhaps the most crucial, you need broadband internet service where the cameras are located. Your upload and download speeds must be high in order to properly support the task of sending video and/or snapshots. The main purpose of cloud storage is to send data directly to a computer or NVR at a location other than where the cameras are located. For many people incorporating cloud based recording means constant video streams to be uploaded all the time, making high speed internet service crucial, and not something to be overlooked.
The upload speed required depends on the number of cameras that will be recorded in the cloud simultaneously, and their resolution. For example, 1 megapixel ip cameras will require about 3Mbps (Megabits) of bandwidth per second, while 2 megapixel 1080p ip cameras will require 4-6 Mbps. For everyday use, we suggest only recording when motion is detected; each camera can trigger a video feed to be uploaded for itself when it detects motion within. This way, you don’t necessarily have all cameras uploading video at the same time.
Technical knowledge base is great to have as well. To be able to understand connectivity and networking and to be able to troubleshoot is invaluable when considering cloud storage. Fortunately the setup is easy enough that with a little research, this task is not too complex for the average computer user.
Lastly, a fast PC with plenty of storage is vital when choosing to build you own FTP server. Your internet service is one thing, but having powerful hardware is crucial to save incoming video streams which can be an intensive process. We recommend using at least an Intel i5 dual core CPU based computer.
Offsite NVR
One of the easiest methods to accomplish cloud based video storage of IP cameras or even DVR systems is by using an off-site NVR. By placing a NVR at a location other than the cameras constitutes recording in the cloud where the NVR is the server being recorded to. Let’s say you want to save video from your business, and you have broadband internet like Verizon FiOS at your home and business. By simply utilizing these internet connections you can make your NVR at home a “NVR in the cloud.”
There are two main ways to connect IP cameras to a off-site NVR:
1. Primary off-site NVR: Cameras can stream directly to the network video recorder located outside the premises
2. Secondary off-site NVR: Cameras stream first to an on-site NVR (primary NVR), and then an off-site NVR can connect to the primary NVR and backup video off-site. This creates a redundant video storage system where there are two copies of video. Should one unit fail the other would have a copy and continue to record even in the event of hard drive failure on either unit. This task is only possible with 123CCTV’s NVR recorders.
Primary off-site NVR: direct camera to off-site NVR streaming
This method involves a data stream to be established between the camera and the NVR in the cloud over the internet. The data stream for IP cameras can encompass video, audio, ptz data, and other metadata. Since this data stream must traverse the internet, it required port forwarding rules to be provisioned on any network where the cameras are located. Otherwise the NVR will be unable to connect to the cameras.
Our IP cameras have a dedicated video stream available via a TCP port which is set by default to 37777 on every camera. A port forwarding rule has to be provisioned for each camera that you have. If you have multiple cameras, their TCP port needs to be unique since every network can only have one port-forwarding rule per external port. First, you have to change the TCP port of the second camera to 37778, and 37779 for the third and so on. Second, create rules in your router to open up the firewall and route traffic for each port to the respective camera’s ip address.
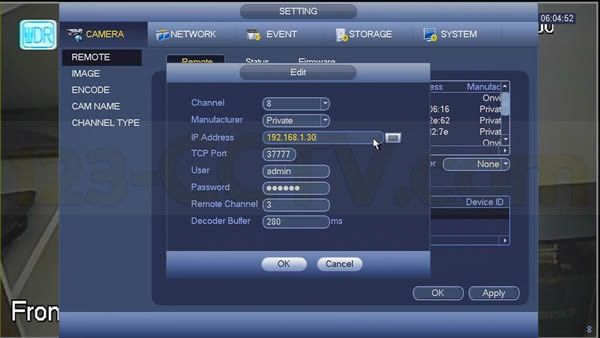
Once port forwarding is established, you can manually add each camera as a Remote Device through the NVR’s menu. Enter the static external ip address of the location where the cameras are located in the ip address field, and the TCP port number for each camera. We suggest changing the default username and password for the cameras to ensure additional security. Once you enter the proper username and password, and hit connect, the NVR will connect to each camera.
Secondary off-site NVR: on-site NVR to off-site NVR streaming
The main difference between this method and the one above is that it doesn’t require many port forwarding rules to be set in the router where the cameras are located. Simply put, from a networking standpoint this is an easy to follow setup. This secondary method of cloud video storage also has the added benefit of redundant video storage on-site and off-site. We recommend this solution over the first for many reasons, especially in the event of internet failure you will still have footage saved on the on-site NVR. For businesses storage redundancy is an important factor to consider.
So how does it work? It’s very simple and doesn’t require much technical expertise. Using simple point and click operation you can configure both NVRs.
First, physically install your PoE IP cameras and use one of our NVR’s with built-in PoE switch to make the process easier. Having a built-in PoE switch on the NVR allows the NVR to automatically assign each camera a different ip address and makes the process of installing cameras on the network a non-technical task that anyone can do. Using the Remote Device menu option, search for the cameras and choose the cameras you want the NVR to connect. Once added to the NVR these cameras will automatically configured for streaming and recording on the NVR.
Once you have a IP camera system with NVR working at the primary location, connect it to the main router on the premises. Configure one port forwarding rule on your router to open port 37777 and point it towards the internal ip address of the NVR. The default ip address of the NVR is 192.168.1.108. If you have a network with a 192.168.1.x subnet, you should be able to ping the nvr at the above ip. You can use GRC Scan to ensure that your port forwarding rule is working and port 37777 is open.
Second, place the secondary off-site NVR which will serve as storage in the cloud in another location where you have internet. Using the Remote Device menu option, manually add cameras from the primary NVR by filling out information as follows:
Address: xxx.xxx.xxx.xxx – Enter your external ip address from the primary location
Port: 37777 – This will stay the same because the NVR will allow you to select different channels to stream from a single port
You should now have all the cameras from the primary NVR streaming to your “Cloud NVR.” You can configure any recording schedule and encoding resolution independent of the primary NVR. You can even record in less resolution to save hard drive storage space and prolong video recording.
Personal FTP Computer
There is another free option to consider for users that have more technical knowledge of how to use a computer. That option being free file transfer (FTP) through programs such as FileZilla. By installing FileZilla on a Windows or Mac computer, you are able to receive data, like recordings or images from cameras via an internet connection. This enables you to have access to these files from anywhere, eliminating the need to be on site for playback or file downloading purposes. Uploading video or images from your IP cameras via FTP is an economical solution for primary video storage without needing a NVR.
For this task you will need your IP cameras, a free FTP program such as FileZilla and some knowledge of networking. With the step by step tutorial below, you should be able to configure your cloud storage setup with minimal effort, regardless of your technical proficiency level.
First we will make a destination folder to save all our snapshots and videos to. Save it as something like “FileZillaFolder.” I suggest saving it on the desktop to find it easily later.
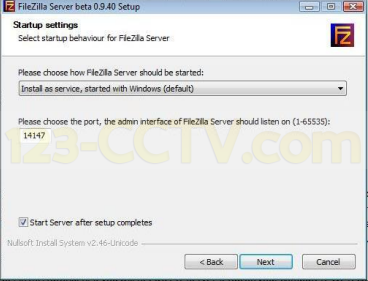
Next as we are demonstrating with FileZilla specifically, you must download the FileZilla server to follow along. At the installation screen, you will see a screen asking which port number you want FileZilla to operate on. The default should be 14147, leave it as it is.
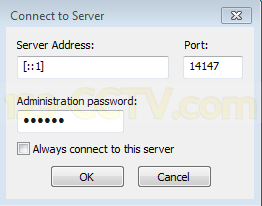
Once it is finished installing a prompt will appear called “Connect to server” with several options for the setup. You can choose your server address, for our purpose we used a loopback address of “[: : 1]” to save directly to our computer. Also there are options for the port number it should operate on. This should be the port number that it was dedicated to at the installation screen. (14147). Choose your own administrative password and click OK.
After you click OK, the FileZilla server will start and you will see the main window for the server application. From here you want to make a new group and user to control administrative rights. Click Edit in the top menu, then choose the option “groups”.
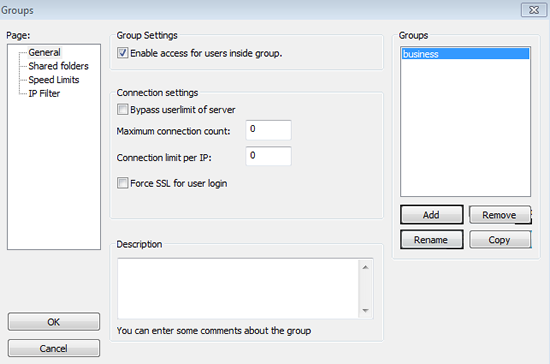
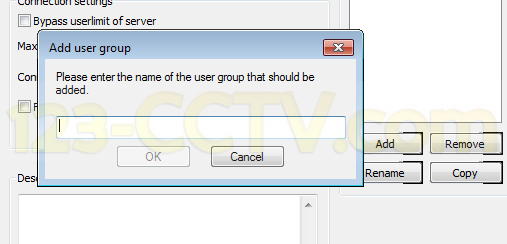
On the right there is a button for “add”. Click add to bring up the window and name your group. For this tutorial purpose we name it “business”. Click ok to save.
From here we go back to Edit and this time select “users.” Now on the left under “page” there will be an option for “shared folders.” Here we will create a new user and select a home directory all at once. Both are important steps for configuration. Under users there will be a button for Add. Click this to add a new user.
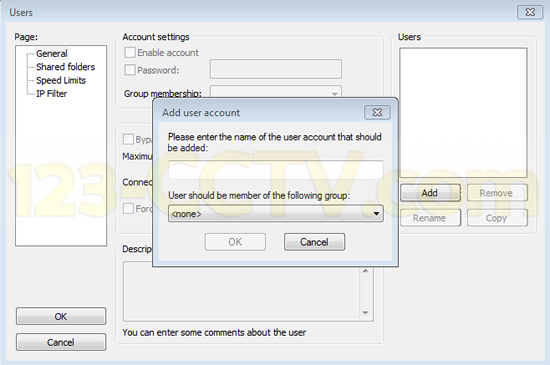
Choose a name for this user and in the drop down menu, there will be the option to choose the group we just made to add this new user to. I named my user “ipcam” and assigned it a password of “ipcam” to keep it simple. Click OK to finalize settings.
Now in the same menu we will need to add a shared folder directory to save our videos and snapshots to. Under “shared folders” there will be a button for “add.” Click this to open the menu, and find the folder named “FileZillaFolder” you made earlier to save your pictures and videos to.
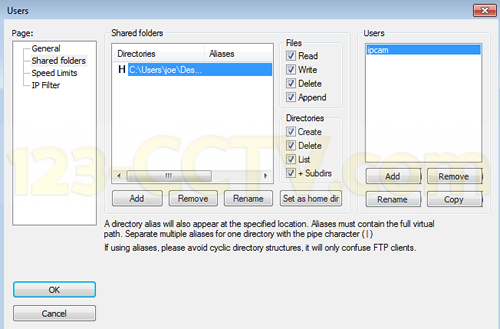
This will automatically make this the home directory for the FTP user we just created. Now when you see it under the “directories” header, click it to select it. Now you will see the files and directories tab on the side that show what you are allowing this directory to do. You MUST make sure that all boxes under “Files” and “Directories” are checked to allow your FTP user read/write acess. Click OK to apply settings and from here we can move on to the rest of the configuration which will be done on the ip camera.
Now that we have our server configured we need to go into our IP camera and change the settings to allow for FTP transfer to our FileZilla computer. First however, we will need to determine what our computer’s IP address is. The easiest way to do this is to bring up the command prompt.
Go to the windows icon in the bottom left of your computer screen. In the search bar, type “CMD” and click on the application to bring up your command line.
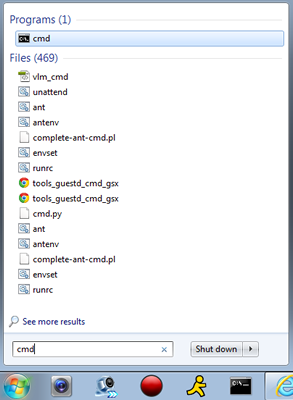
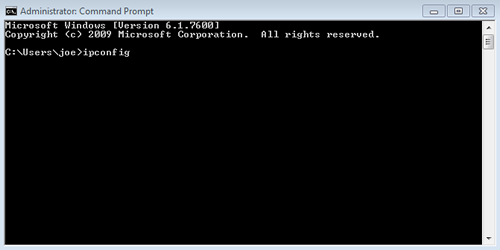
From here you need to type in the command “ipconfig” to get your network information. Click enter to run the command.

Here you will see a response that says “ipv4” with an ip address such as 192.168.1.4 This is our computer’s ip address.
Write down your IP address and you can then close the command prompt.
Go to your internet browser and type in your IP Camera’s IP address. This will access the IP camera interface as long as it is connected to the network.
Here type in your IP camera’s login information to access the settings. It’s normally admin/admin if you haven’t changed it to something else. Once you access the IP camera, there will be a tab at the top of the called “setup.”
![]()
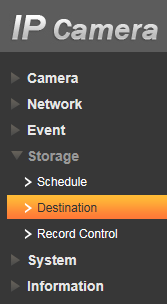
Clicking this will bring up settings options. With setup selected there will be more tabs on the left side to bring up further menus. Click “storage” to bring up the drop down menu and then click “destination” to bring up the menu we will need.
The first tab on this menu is “Path.” Here you will will see an option called “FTP” with boxes next to it. Under the “Record” and “Snapshot” sections you must make sure all three boxes for FTP are selected. Make sure to save your settings.
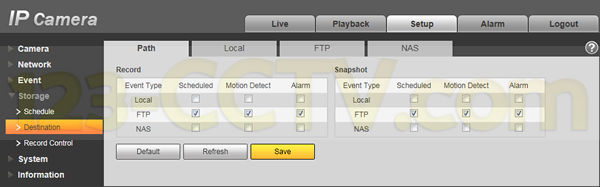
Next go to the “FTP” tab at the top to bring up the next menu.
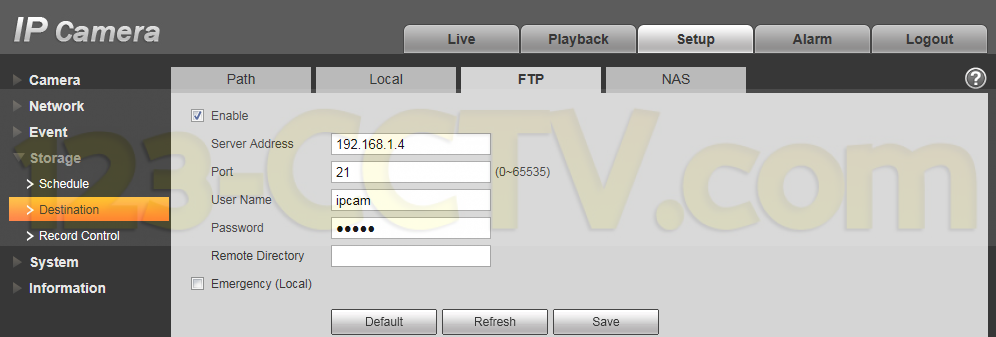
There will be a checkbox for “enable.” Make sure this is checked, otherwise this will not work! The “server address” will be your computer’s IP address. Next, the “port” should be 21. “User name” should be the user you created above in FileZilla. We named ours “ipcam.” Fill in the password and leave “remote directory” blank otherwise it will make a new folder within the destination folder and things will get messy. Save your settings as always and you will be set with the IP camera settings.
From here, you should be all set up and you should see that your camera is recording lines of text in your server window, showing that there is a transfer happening. All the recorded data and videos are then stored in the folder you created.
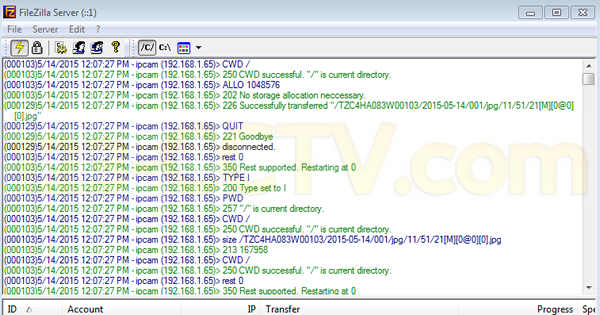
It is worth noting at this point that if you do not see activity in your server screen, you might have to disable the firewall on your computer to allow for this FTP transfer.
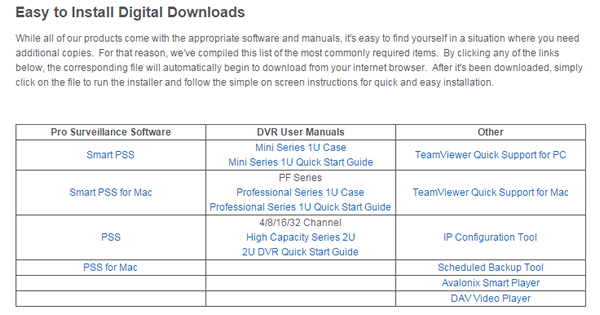
The videos are saved in DAV format. To play these types of videos, we recommend “DAV Player” that can be downloaded directly from our website here:
http://www.123-cctv.com/support-downloads/
It will be available under the “Easy to install Digital Downloads” section, under “Other.”
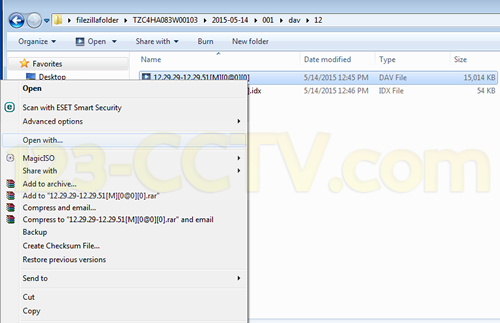
Choose a recording in your folder and right click to bring up the menu. From here click “open with…” to choose the player you want to view the recording with. Set it to the DAV Player you just downloaded and installed. Now you should be able to view your recordings.
Your FTP computer should be all set up and ready to go from here. You can configure FTP credentials for the same user in multiple cameras. Each camera will upload video and/or snapshots and save them in a different folder name according to the camera’s serial number.
Your folder within the destination folder will be named the camera’s serial number by default.
Paid Cloud Storage Services:
The last option to keep in mind is implementing a paid cloud storage service. This is an option more geared towards big businesses and users that need a lot of storage capacity. The average user would probably find this option too much of a hassle for them when they look at the pricing and realize there is other options available. In fairness, there is some benefits as well as restraints.
With many cloud storage hosting services, often times you must use their cameras and products with the service. Many have cameras and software specifically designed and supported with their service. Often times you do not even outright own the cameras, you are renting them through the company. You are at the will of the service provider, and this is something that is simply not acceptable for users that are security and privacy minded.
The cameras and software are often subpar equipment. The cameras are normally cheaper grade cameras with little support base behind them. Simple models that are really only suitable for indoor home use are normally standard, and most often they are lacking several key features that consumers look for when doing research. Some examples being high quality night vision IR technology, varifocal/motorized lenses, outdoor waterproof/vandal proof features, adjustable and secure mounting, most aren’t even quality HD.
Another issue that many users don’t consider until they have already made their purchases, is that these paid services cameras are often times incompatible with other services and NVR units. After already installing and using these cameras for a period of time they realize that if they decided to pursue other options for storage, their cameras will have to be replaced, and then they find themselves again locked into using the service.
For most cloud storage providers, you normally have to pay monthly for their service. This monthly fee could be for a defined amount of storage, but more often than not it refers to how many cameras you are using. Amount per month/ per camera means that if you have a decent sized system you will pay exorbitant amount all said and done just to record with your cameras. The costs can quickly skyrocket for sub par service using sub par equipment. If anything, it pays to do your research, purchase professional grade equipment first, then find a cloud storage provider that is compatible with your IP cameras.
Many businesses that need a large amount of storage might find this solution appropriate to their requirements however. Some services will offer unlimited cloud storage, and support for their service. This will help larger businesses that need to be up and running 24/7 and can’t afford any downtime. If your business has a lot of sensitive information or videos that cannot be leaked, this may not be the best choice however. While the data is your property, it is not exactly under your control when you send it to a cloud storage database.
There are many options for cloud storage that are economical and feasible for every type of user. Figuring out what your needs are and researching your options will allow you to choose the best option for you.
Anthony Berlin
Latest posts by Anthony Berlin (see all)
- Dummies Guide To Remote Viewing Security Cameras - November 5, 2018
- How to add IP cameras and HD Cameras to your Hybrid DVR - May 17, 2016
- How to change the order of IP cameras connected to your PoE NVR - February 29, 2016
Can I connect a Remote IP Camera to a FTP of Filezilla server?